On this page
If you’ve ever noticed your clothes taking forever to dry—or worse, that burning lint smell—you may need to clean your dryer vent. Neglecting this chore isn’t just about convenience. According to the U.S. Fire Administration, thousands of dryer fires occur each year, many caused by lint buildup in the vent. The good news? Learning how to clean your dryer vent duct is simple, and you can do it yourself in less than an hour.
Key Takeaways
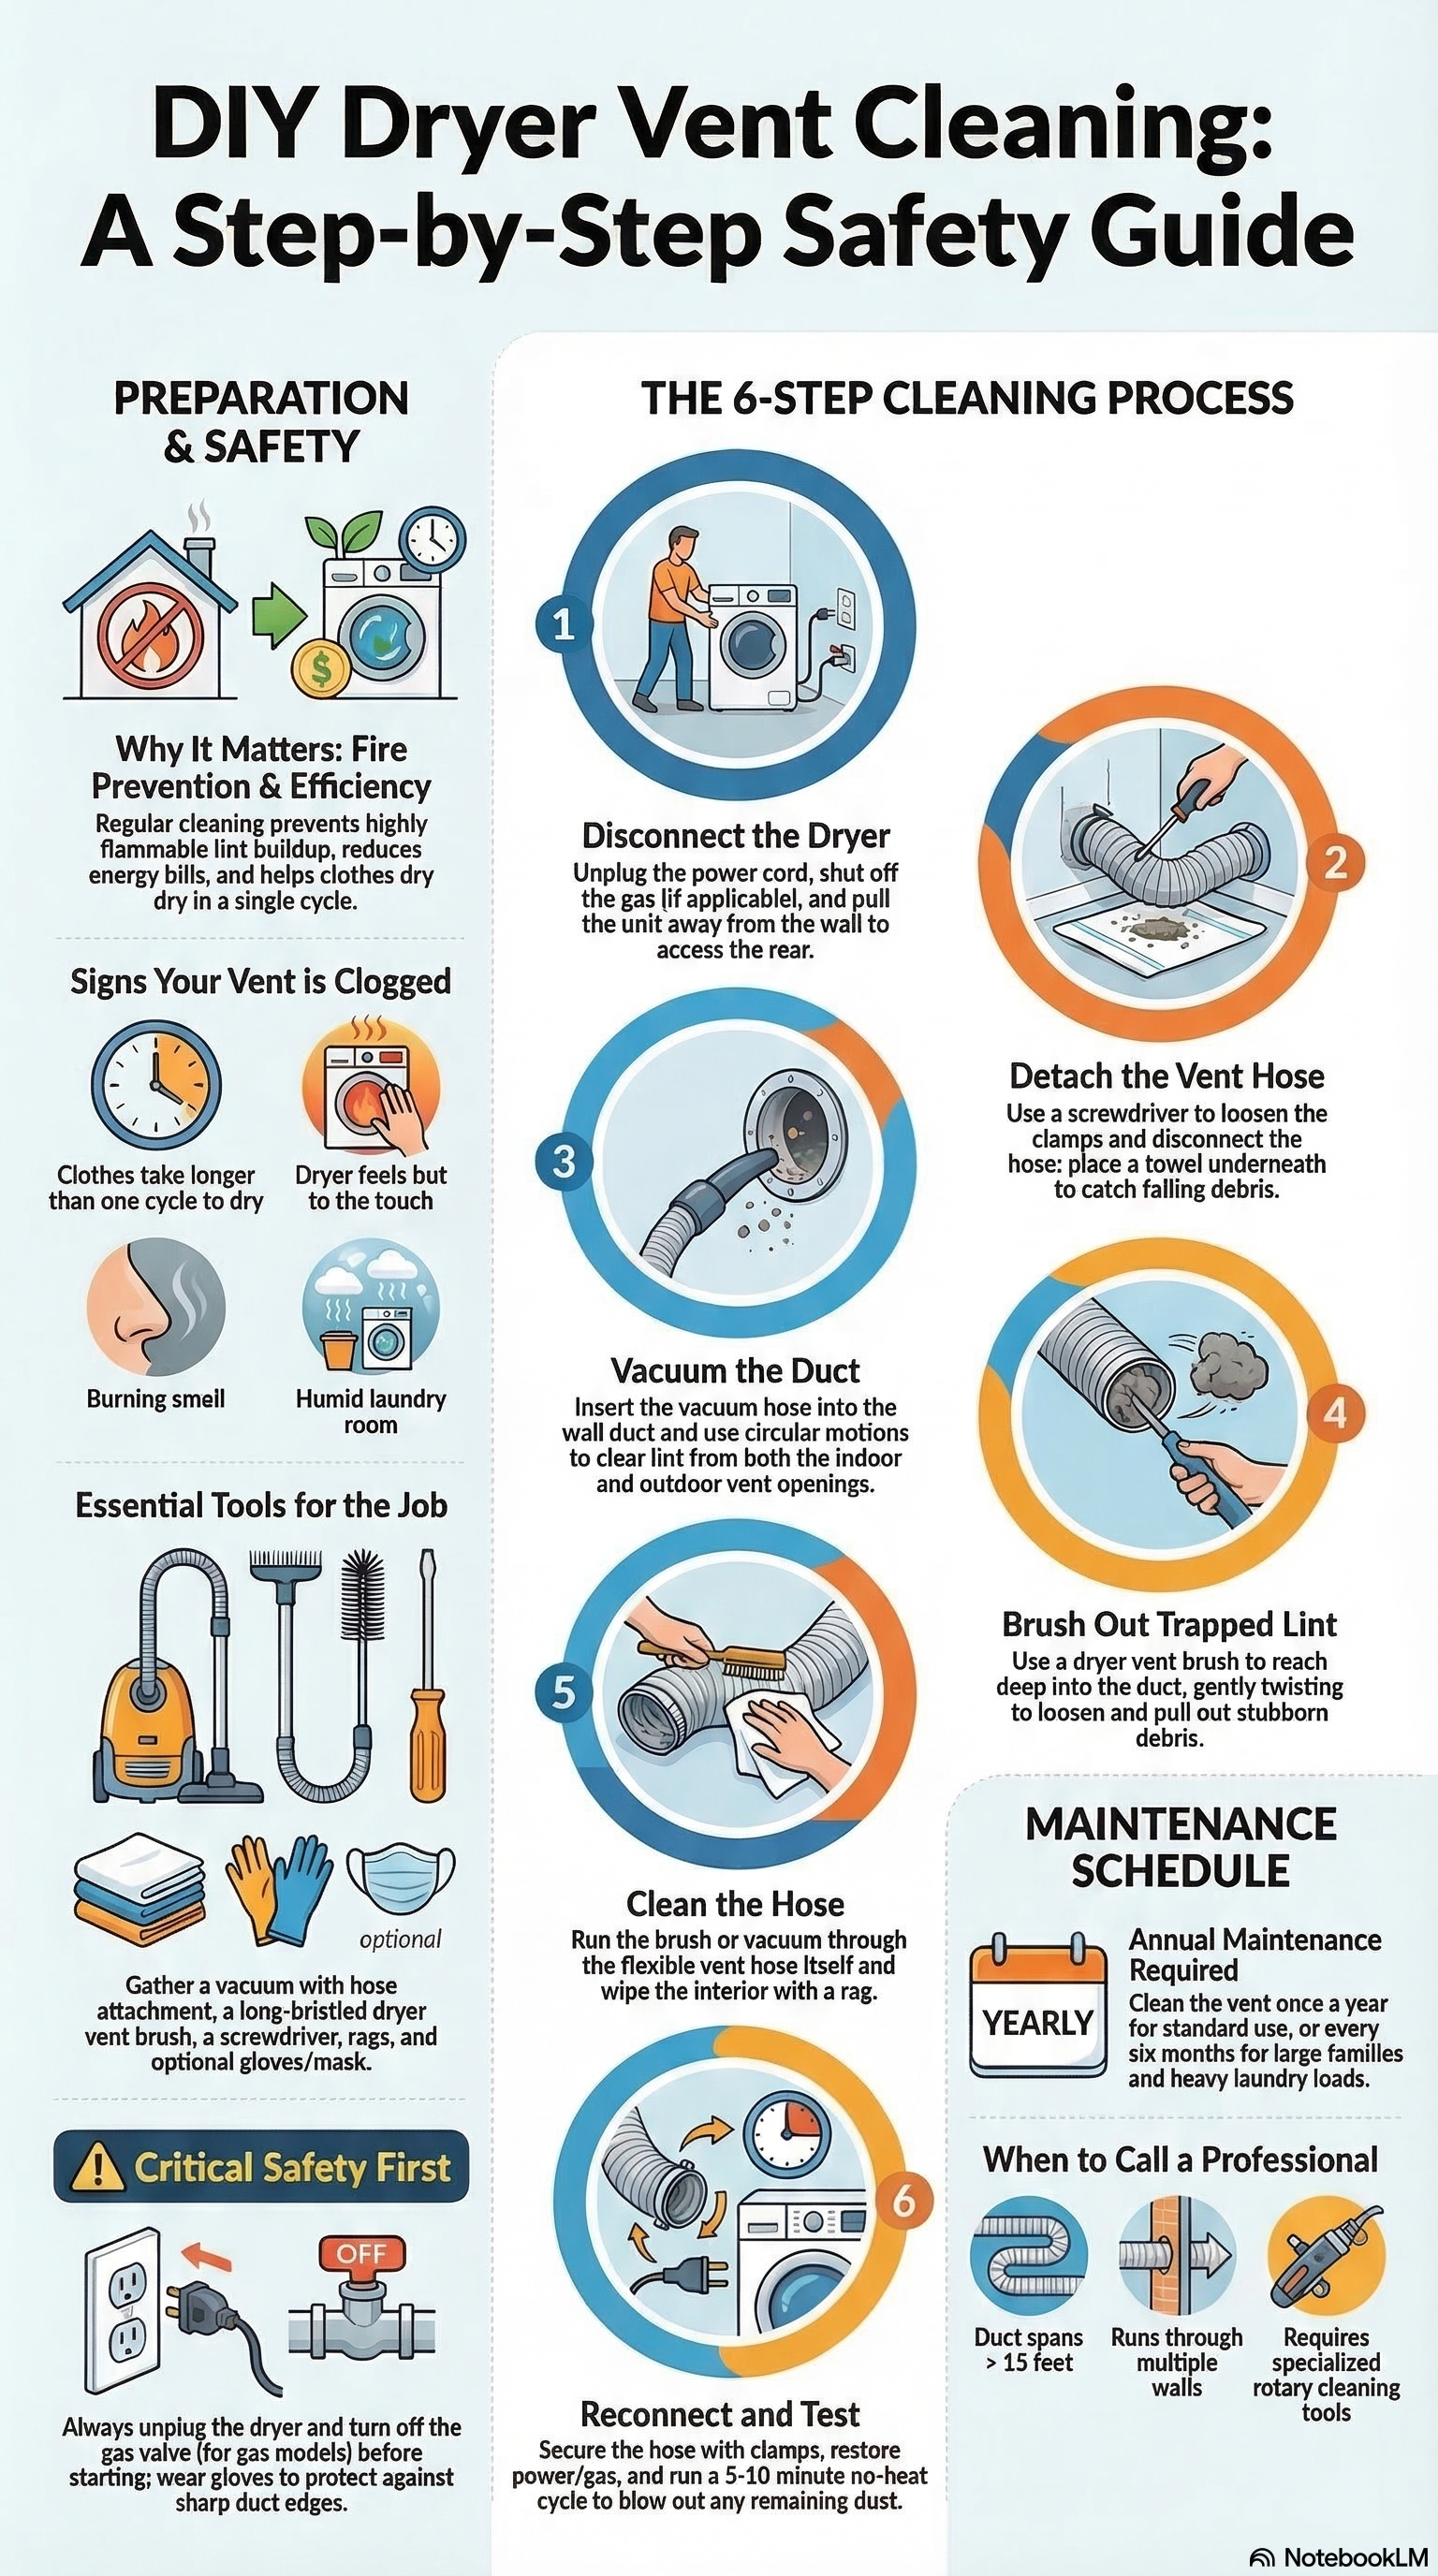
- Cleaning your dryer vent duct prevents fires, improves energy efficiency, and extends the appliance's lifespan.
- Gather tools like a vacuum, dryer vent brush, screwdriver, and rags to perform the cleaning.
- Follow six steps: disconnect the dryer, detach the vent hose, vacuum the duct, brush out lint, clean the vent hose, and reconnect everything.
- Aim to clean your dryer vent annually, or every six months for heavy use; watch for signs like longer drying times.
- If your duct is long or complicated, consider hiring a professional for thorough cleaning.

How To Clean Your Dryer Vent Duct
In this updated 2025 guide, I’ll show you how to safely tackle DIY dryer vent cleaning and keep your dryer running efficiently. Whether you have a standard or gas dryer vent, these steps will help you prevent hazards, lower energy bills, and extend your dryer’s life.
For more dryer efficiency tips check out Energy.gov.
Quick Answer:
Cleaning a dryer vent duct involves disconnecting the dryer, removing the vent hose, vacuuming lint from the duct, brushing out remaining debris, and reconnecting the system. Most homeowners can complete dryer vent cleaning in about 30–45 minutes using a vacuum, vent brush, and screwdriver.
Why Cleaning Your Dryer Vent Matters
- Fire Prevention: Lint is highly flammable. Regular cleaning reduces fire risk.
- Energy Efficiency: A clogged vent makes your dryer work harder, using more electricity or gas.
- Appliance Longevity: Clean ducts reduce wear and tear on your dryer.
- Faster Drying: Say goodbye to running the same load twice.
Signs Your Dryer Vent Is Clogged
Before grabbing tools, check for these common warning signs:
- Clothes take longer than one cycle to dry
- The dryer feels very hot during use
- A burning or dusty smell appears while running
- The laundry room becomes humid or warm
- Lint buildup is visible around the outdoor vent
Tools You’ll Need
- Vacuum with hose attachment
- Dryer vent brush (long bristles are best)
- Screwdriver (for clamps or panels)
- Rags or paper towels
- Optional: dryer vent cleaning kit (with extensions for long ducts)
- Gloves and a mask (to avoid dust and lint inhalation)
⚠️ Safety Tip
Before starting dryer vent cleaning:
- Unplug the dryer from power
- Turn off the gas valve for gas dryers
- Wear gloves to avoid sharp duct edges
- Use a mask if you’re sensitive to dust or lint
Taking a few minutes to prepare keeps the process safe and simple.
Step-by-Step: How to Clean Out a Dryer Vent Duct
Step 1: Disconnect Your Dryer
- Unplug the dryer from its power source.
- If you have a gas dryer vent, carefully turn off the gas valve before moving it.
- Pull the dryer away from the wall to access the vent hose.
Step 2: Detach the Vent Hose
- Use a screwdriver or loosen the clamp to disconnect the dryer vent hose.
- Place a towel under the connection point to catch stray lint.
Step 3: Vacuum Out the Duct
- Insert the vacuum hose into the vent opening.
- Move slowly in circular motions to capture as much lint as possible.
- Repeat on both ends of the duct (dryer side and wall/outdoor vent).
Step 4: Brush Out Remaining Lint
- Insert a dryer vent cleaning brush into the duct.
- Gently twist and push to loosen trapped lint.
- Pull the brush out and remove debris. Repeat as needed.
Step 5: Clean the Vent Hose
- Run your brush or vacuum through the dryer vent hose itself.
- Wipe down the inside with a rag if reachable.
Step 6: Reconnect and Test
- Run your dryer for 5–10 minutes on a no-heat cycle to clear remaining dust.
- Reattach the hose securely with clamps.
- Restore power (and gas if applicable).
How Often Should You Clean Your Dryer Vent?
- General rule: Once a year.
- Large families or heavy use: Every 6 months.
- Signs it’s overdue: Clothes take longer to dry, dryer feels hot to touch, or you see lint outside the vent cap.
When to Call a Professional
If your duct runs through multiple walls, spans more than 10–15 feet, or you just don’t want the hassle, hire a pro. Many HVAC and duct cleaning companies offer dryer vent cleaning services. Professionals use rotary tools and high-powered vacuums to clear deep clogs you might miss.
FAQs About Dryer Vent Cleaning
How do I know if my dryer vent needs cleaning?
A: If clothes take longer than usual to dry, or if the laundry room feels hotter than normal, it’s a clear sign your vent is clogged.
Can I clean my dryer vent myself?
Yes! With basic tools, most homeowners can handle DIY dryer vent cleaning in under an hour.
How do I clean a gas dryer vent safely?
Always turn off the gas valve before disconnecting the dryer. Double-check connections before turning it back on.
How do I clean a dryer vent hose behind a stacked unit?
Use a flexible vent brush with an extension kit. These are designed for hard-to-reach spaces.
How often should I clean my dryer vent hose?
Ideally every 6–12 months, depending on how often you use your dryer.
Can a clogged dryer vent cause a fire?
Yes. Lint is highly flammable, and clogged vents are a leading cause of dryer fires in homes. Regular cleaning significantly reduces this risk.
How long does it take to clean a dryer vent?
Most DIY dryer vent cleaning jobs take 30–60 minutes, depending on vent length and how much lint has accumulated.
Final Thoughts
Cleaning your dryer vent duct may not be glamorous, but it’s one of the simplest dryer maintenance recommendations that can save money and protect your family. With just a vacuum, a brush, and about 30 minutes of your time, you can keep your dryer running like new and avoid serious safety risks.
Make dryer vent cleaning part of your yearly home maintenance checklist — your dryer will run better, your energy bills will drop, and your home will be safer.
So grab your tools, block off a little time this weekend, and make it happen—you’ll thank yourself the next laundry day.