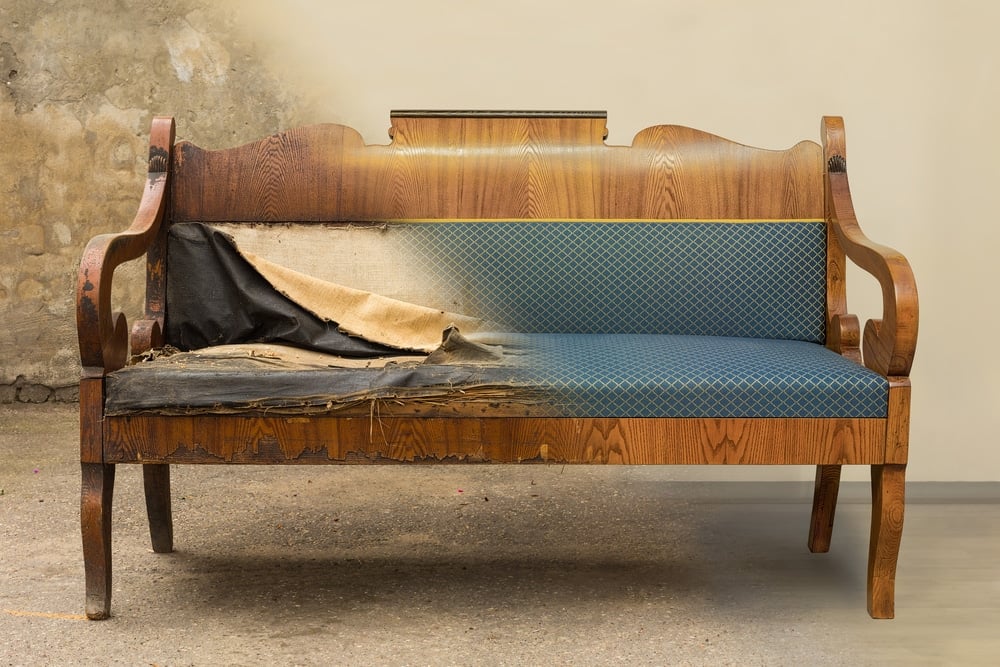
Have you got some old furniture lying around that you are attached to but aren’t quite sure how it fits into your current decor? Worry not!

Restoring, repainting, and reupholstering old or antique furniture into something practical or simply making it look near new again is a great way to keep those sentimental pieces around and do your bit for the planet by reducing household waste.
New Life Into Old Furniture
Recently I was inspired by our friends over at justcraftingaround, as they restored a decrepit piece of furniture. The idea of bringing an antique piece of furniture back to its original make sounds kinda fun.
DIY doesn’t have to be difficult or complex and often, you can save many wooden pieces with a simple sanding and paint job.
Restoring Wooden Furniture
Wooden furniture tends to be longer-lasting, especially older antique pieces that were constructed in a time where quality, hand-crafted builds were the norm and the focus wasn’t on providing cost-effective or cheap furniture that only lasts a handful of seasons.
Sadly, some wooden furniture does not stand the test of time due to exposure to moisture and dampness without maintaining protection in the way of replenished varnish or wax coats.
If you are restoring wooden furniture, there are few things you should inspect for before starting the process including;
- Structural damage that could affect the purpose of the piece, i.e. leg damage to a dining room chair
- Woodworm holes that could indicate an infestation, holes don’t guarantee that woodworm is still living in the wood but you should inform yourself on woodworm and it’s potentially harmful effects on furniture and humans
- Any hardware and where it’s located on the piece - it’s recommended to take photos of anything you remove and where it came from to ensure everything goes back together properly
Strip Back Old Surfaces
You’ll need to start by stripping back any remaining varnish or polish on the surface of the wood, it’s recommended to do this in a well-ventilated area, outside is safest but if you are working inside make sure to put down protective sheets and open all the windows. The stripper is usually a cream or paste that is rubbed into the surface of the wood and then you will need to leave it between 5 to 30 minutes depending on the thickness of the existing layers.
Start rubbing off the dissolved mix of varnish and polish, reapplying the stripper cream if necessary for areas that still need the old protective coating removed. Once cleared, you will need to neutralize any remaining stripper on the surface to ensure the remainder of your restoration goes to plan. The type of neutralizer your use will depend on the instructions given on the back of the surface stripper so make sure you get the right solution.
Neutralize The Surface
Once the surface is neutralized, clean the surface with a soft cotton rag and leave it alone for at least 24 hours. After 24 hours have elapsed, you will need to gently sand the surface to relax and smooth over the wood fibers that have been disturbed during the stripping process. Always make sure you work with the grain of the wood and keep the area clear of dust by regularly brushing down the surface and vacuuming the area.
Fixing The Flaws
It’s at this point you might have noticed some flaws in the furniture piece, either bleached areas that have sat in the sun, holes or cracks that were previously hidden by layers of old wax and varnish and shallow dents in the surface from a lifetime of use. Carefully fill holes and cracks using proper wood filler and sand for a smooth finish, if you are concerned about structural integrity, you can provide extra support with additional hardware or have it inspected by a professional restorer. Bleached sections of wood can be restored using a color-matched wood dye that is applied generously to the surface using a broad brush. Allow the dye to absorb into the surface of the wood and wipe any remainder away with a soft, clean cloth. Dents can be removed from the surface using heat but this will only work on solid wood furniture.
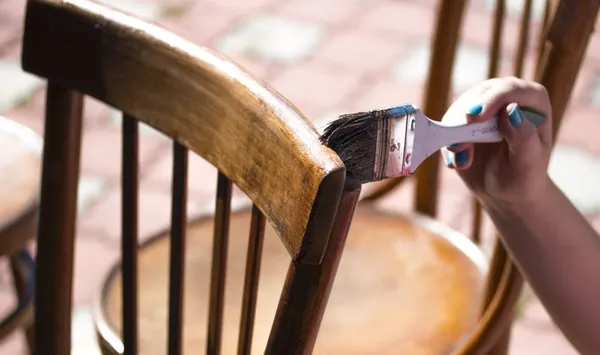
Finishing The Restoration
Once you have fixed the flaws in the furniture piece and everything has dried, it’s time to apply a layer of finishing oil. Let the oil penetrate the wood surface for approximately 10 minutes then wipe away any excess before it starts to feel tacky to the touch. Then leave the piece for between 5-6 hours and gently rub (moving with the wood grain) the surface with 0000 gauge steel wool before you apply the next coat. You’ll need to repeat this process as many times as the oil recommends but the more layers you add, the more durable your restored furniture piece will be against surface damage.
What is CNC Turning? CNC milling, CNC turning carves a piece of raw material to create a functional part. CNC turning is unique because it rotates the piece as it is being worked on.
The final step in your wood furniture restoration is to apply a layer of high-quality furniture wax across all the surfaces and leave for at least an hour without touching the piece. This ensures your furniture has damp proofing against penetrative moisture and is protected against potential beasties (woodworm). Then polish with a soft clean cloth to make it shine. While the surface is drying try to avoid leaving it in direct sunlight or near any heat sources such as fireplaces and radiators that could cause the wood to warp and distort.
Congratulations! Your hard work has now rescued your beloved furniture piece and with careful maintenance your furniture can remain a part of your household for generations to come.
- Essential Steps To Take If Your House has Been Damaged In Fire
- Go Into The Woods This Christmas
- A Dad's Guide To A Clean Home
- Living With Anxiety? Here’s What You Can Do To Smartly Deal With It
- Daddy Cooks: Tyson BBQ Chicken Strips
Image Credits
Breathing New Life Into Old Furniture 1 - Shutterstock - Royalty-free stock photo ID: 726372607
By Juris Kraulis
Breathing New Life Into Old Furniture 2 - Shutterstock - Royalty-free stock photo ID: 208314343
By Hikki