I’ve never been one for overpriced prefab carports or waiting around for contractors who ghost you after giving a quote. So when I needed covered parking for my growing fleet of dadmobiles—okay, two cars, a motorcycle and a fishing boat—I decided to build my own.

I had a 40-foot high cube shipping container sitting on the side of my property, already used as a gear bunker. One weekend, I figured: why not throw a shed roof off the side and turn this beast into a legit carport?
The container’s 9.5-foot height gave me plenty of room for a slope, and before I knew it, I had space to park four vehicles in the shade—and under budget. No permits, no stress, just a fast and rugged DIY project built like a tank.
Here's how I did it, and how you can too.
1. Why I Used a Shipping Container as the Base
I didn’t start out thinking, “Let’s build a carport with a shipping container.” But when I walked past my 40-foot high cube—just sitting there, rock solid and rust-resistant—I realized I already had the backbone of a killer carport and motorcycle storage. The thing’s a tank: windproof, watertight, and built to hold up in conditions far rougher than my suburban backyard. At 9.5 feet tall, it gave me just the right height to run a shed-style roof with a good slope and still park my pickup with the roof rack under it.
Plus, bonus: the container doubles as lockable storage for tools, seasonal junk, and the mower. Instead of throwing up a standalone carport and then adding a shed later, I got both in one shot. It’s the kind of practical overkill that dads like me live for—sturdy, efficient, and no-nonsense. Honestly, once you start thinking in containers, you see them as the Swiss Army knives of backyard builds. This wasn’t just about saving money—it was about building something that’s going to last longer than most new cars.
2. The Basic Layout: One Container, One Sloped Roof
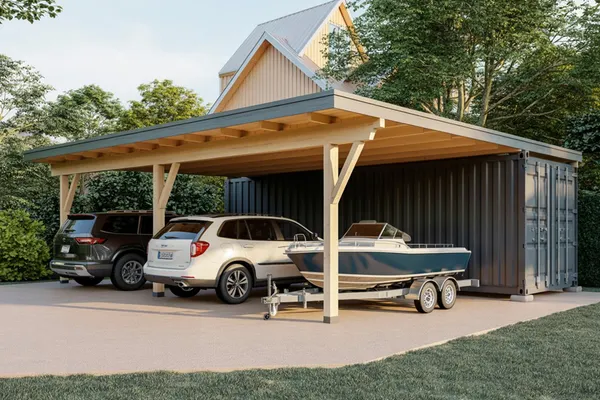
The layout was so simple it almost felt like cheating. I set the 40-foot container on a compacted gravel pad just off the driveway—parallel to the house, but with enough clearance for vehicles. Then I designed a shed-style roof to run off the side, sloping away from the container. Nothing fancy—just basic slope physics and a tape measure.
The high cube’s 9.5-foot height was the magic number. With just a few feet of slope, I ended up with about 7.5 feet of clearance at the far end—plenty of headroom for my SUV, the wife’s car, and my boat trailer. I spaced out three support posts along the outer edge, then ran rafters from the top edge of the container to those posts. I kept it open for now, but I might close in the back eventually to block wind.
It looks clean, works like a charm, and gives me covered parking for up to four vehicles depending on how I park. Not bad for a weekend project—and the container makes it feel like an industrial-grade solution, not some wobbly backyard car tent.
3. What I Needed to Build It
If you’re thinking you need a welding setup and a crane to pull this off, relax. I kept it straightforward—stuff you can get from any hardware store, and no fancy tools required. The container came first, of course. I picked up a 40-foot high cube used from a local dealer. Once it was placed and leveled, I moved on to the roof materials.
I used pressure-treated 6x6 posts for the supports—three spaced evenly about 12 feet from the container. For the rafters, I went with 2x8s since I wanted to span 12 to 14 feet without sagging, and I used metal brackets to secure them. On top, I laid galvanized metal roofing panels, the kind with built-in ridges so rain slides right off. Screwed everything down with self-tapping roofing screws and sealed it up with flashing.
Tools? Just the basics: circular saw, impact driver, drill, post hole digger, level, and ladder. I threw in a little elbow grease and caffeine, and that was it. If you’ve ever built a deck or a shed, you can handle this build. No permits. No contractors. Just good old-fashioned dad engineering.
4. Step-by-Step: How I Built It in Two Weekends
Weekend one was all about prep. Well, first you may need to get a container. You can find used shipping containers for sale starting around $3000.
I had already leveled out the gravel base months earlier when I placed the container, so I just double-checked the pitch and marked where the posts would go. Dug the holes, set three 6x6s in concrete, and let them cure overnight while I caught a ballgame and grilled burgers.
Weekend two was go-time. I measured out my rafter spacing, cut all the 2x8s, and attached one end directly to the top rail of the container with steel brackets and lag screws. The other ends were set on a horizontal beam running across the tops of the posts. Everything was pre-drilled and leveled—because nothing’s worse than a saggy, crooked roof. I finished off with metal roofing panels, starting at the low end and overlapping upward. Screwed them down tight, added some flashing where the roof met the container, and called it a day.
All in, I had a rock-solid carport that looked like a pro job—but without the cost or the wait. It’s held up through storms, hail, and heatwaves. And I still had time Sunday night to watch a movie with the kids.
5. How It Works and What I Might Add Next
Right now, this setup handles everything I throw at it. I’ve got space to park my truck, the wife’s SUV, and my boat—all shaded, dry, and out of the weather. Sometimes I even wheel the grill under it during a rainstorm. The container’s still pulling double-duty as my workshop, complete with tool racks, fishing gear, and an old fridge for weekend beverages. It’s the ultimate backyard upgrade for any dad who’s tired of shuffling cars or scraping ice off windshields.
But like any good DIY project, I’m already thinking of version 2.0. I might add motion-sensor LED lights under the roof, or maybe a sidewall with barn doors for more wind protection. I’ve also considered mounting solar panels on top—it’s got perfect sun exposure all day long.
What started as a weekend project turned into one of the most useful builds I’ve ever tackled. Cheap, fast, and solid—everything a dad could ask for. And the best part? No HOA drama, no permits, and no regrets. Just me, a container, and a little bit of backyard know-how.
Building this DIY carport with a 40-foot high cube shipping container turned out to be one of the most practical upgrades I’ve made to my property. It gave me secure storage and covered parking without the cost or complexity of a full-blown garage.
The project was quick, affordable, and surprisingly simple—perfect for any hands-on dad who wants real results without waiting on permits or contractors. Plus, I’ve got room for future upgrades like lighting, solar panels, or side enclosures.
Of course, this setup isn’t the only type of a shipping container roof. You can build center-pitched roofs, go full barn-style, or even connect two containers with a roof span across the middle. The options are wide open depending on your space, budget, and vision. But if you need something fast, solid, and functional—this container carport is a tough one to beat.